Re-potting Made Easy
How and when to re-pot an orchid is something that most people are afraid of but with a bit of guidance and experience you will find it’s quite easy.
Many of the orchids that we grow originate from trees in rainforests so it is usually easier for us to grow them in pots, although some can be grown mounted on pieces of cork bark.
We recommend bark compost as this is open and free-draining with plenty of air spaces around the roots to prevent them from keeping too wet.
Orchids are usually re-potted every 2-3 years for two main reasons. Firstly to give them a larger pot with more room to grow and secondly to refresh the bark as this can start to break down after a few years. It is usually best to re-pot or divide in the spring when the plant is just starting to grow again and has the whole summer growing season ahead of it.
PHALAENOPSIS POTTING
See Sara's Easy Phalaenopsis Re-potting Video on our YouTube Channel
 STEP 1.
Re-pot your Phalaenopsis when it is climbing out of its pot. They naturally grow on trees with their leaves hanging down so after a few years in a pot, the new leaves tend to be growing all over to one side and so it needs to be repositioned more upright.
Choose a time when its flowering has finished and when the roots are actively growing. Cut the old stem right back to the base and if still in flower, the blooms can be placed in water.
 STEP 2.
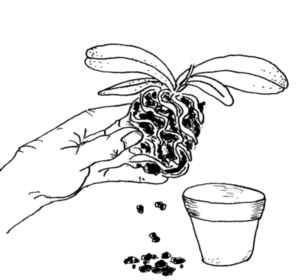
Remove the plant from its pot and shake off the majority of the old bark compost. If it has been several years since it was last potted then the compost may have started to break down. Keep this old bark separate from the new media about to be used.
 STEP 3.
Using clean, sharp secateurs or scissors, trim back the roots to a length of about 10cm minimum. Healthy roots should be white or green and plump. Over-watered roots are brown and shrivelled. Take this opportunity to remove any dead leaves and completely dead roots.
 STEP 4.
Position the plant in a clean pot, slightly bigger if necessary and hold in place, centrally, with one hand, whilst filling up with fresh bark compost with the other. They grow well in clear pots but these are not essential. Choose a pot that has plenty of drainage holes.
 STEP 5.
Making sure the bark is pressed down firmly to anchor the plant, top it up to just below the rim of the pot. Make a note of the potting date on the label. Use the clear pot to your advantage, keep an eye on the roots and you will see if they are keeping healthy.

STEP 6.
Water about once every 1-2 weeks and spray the surface of the compost to encourage the new roots to grow. Soon it will make a new leaf and the next flower spike will shortly follow.
We stock everything you need to repot your orchids...
We are pleased to be stockists of Growth Technology products such as Orchid Focus Grow, Orchid Focus Bloom and Orchid Myst fertilisers that you can use all year round to promote a healthy plant and better flowering.
CYMBIDIUM POTTING
 STEP 1.
Re-pot when the plant has no more room in the pot and it is full with pseudobulbs above the surface and roots below. Prepare some bark-based compost, peat, perlite, moss or charcoal can be added if you wish. If the bark you have is very dry, damp it down to reduce the dust and this will also help with the watering in the first few weeks after potting. You will also need some crocking material such as polystyrene chips for drainage and a sharp knife or pair of secateurs.
 STEP 2.
Once out of its pot, the plant should have a good system of clean, white roots. If they are soft and brown then take care you are not over-watering. If the plant is large, you may wish to divide it. Do not be afraid to cut through the rhizome that connects the pseudobulbs so dividing the plant in half. Make sure you each division has at least 4-5 pseudobulbs and that at least one of those has a new leaf shoot.
 STEP 3.
Prepare the plant for potting by trimming back some of the roots and remove any old, broken-down compost. Leave a few centimetres of roots as an anchor for the plant in its new pot. Take this chance to tidy the plant up by removing old, dead leaf bracts, dead flower stems and trimming damaged leaves.
 STEP 4.
Choose a new clean pot in which the plant will have enough room to grow for another 2-3 years. In the base, place a layer of crocking material for drainage. The pot should also have plenty of holes in the base to aid good drainage
 STEP 5.
Position the plant in the pot so there is plenty of room in the front of the new shoots to allow them to develop and grow into pseudobulbs. Holding the plant steady in the correct position with one hand resting on the rim of the pot, start to fill in with fresh bark.
 STEP 6.
When you have filled the pot with fresh bark, all around the plant, firm the compost down with your thumbs or a potting stick, a wobbly plant will not root in easily. In the end the compost should be just below the rim of the pot with the base of the new growths sitting on the surface of the bark. Now give the plant a thorough watering, flushing through from the top.
